This guide was last updated in February 2026 in preparation for Fall 2026. Please check with your Student Onboarding Advisor or consult the information on the Location Resources page to confirm your specific requirements.
If you are attending a Verto Abroad Experience and need to acquire a student visa for your location, this guide is for you!
Please note: This guide is for U.S. passport holders ONLY. If you hold an international passport, please contact your Student Onboarding Advisor to discuss next steps.
STEP 1
Determine if you need a visa.
For the Fall semester, you will need a student visa if you are attending Verto’s Prague, Seville, or Florence abroad experiences. For Spring, you will need a student visa for Verto’s Seville and Florence abroad experiences.
What is a visa and why do you need one?
A visa is an official document placed in your passport by the government of a foreign country which serves as permission for you to enter, stay, or transit through that country for a specific purpose and duration.
Each country has its own set of rules and regulations regarding entry and stay. A visa ensures that you meet the country’s requirements for the duration of your Verto abroad experience.
STEP 2
Make sure you have a valid passport.
You need to renew your passport if:
- You previously had a passport, but it is now expired.
- You currently have a passport, but it expires before the required validity period for your program:
- For London, Buenos Aires, Prague, and Florence, this means your passport must be valid six months after the program end date.
- For Seville, this means your passport must be valid one year after the program start date.
Considering a Spring semester in another location? Make sure to check that location’s passport requirements too!
In addition, your passport must have at least two blank pages available so there is room for your student visa to be affixed.
If you need to apply for or renew your passport, please review Verto’s Passport Guide for step-by-step instructions. It is critical that you start this process today since it can take 10+ weeks on average to get your passport.
Once you have your valid passport:
- Sign the signature line on Page 3.
- Make a few photocopies of the photo page. (You’ll need these for your visa application).
- Upload a copy of your passport to the Student Portal.
STEP 3
Review Verto’s visa seminar & resources.
The Student Onboarding team hosts webinars that explain each location’s visa application process in detail. You can find these events listed in the “Consulate Guides & Checklists” folder for each location on the Location Resources page, for your specific location. All of the events are recorded so you can listen on your own as well, and the recordings are posted under the event invitation or in the student visa checklist.
We highly recommend listening to these webinars before beginning the process.
You can also find detailed visa guides for each country and each consulate in the Location Resources page. Remember that your Student Onboarding Advisor is a great resource too.
Parents and guardians, please ask your student to log in to VertoConnect so that you can view this information together.
STEP 4
Identify your consulate and their requirements.
To obtain a visa, you will need to follow a specific process and submit the required documents to the embassy or consulate of the country you wish to visit. You will either need to make an appointment to bring these documents in person to your local consulate, or send them by mail to the embassy or consulate. The method of submission varies by country and consulate.
What is a consulate?
An embassy or consulate is a diplomatic establishment that represents the government of a country outside of that country’s borders. A consulate provides services to its citizens while they are abroad (for example, Italian citizens living or traveling in the U.S.) and also provides services to non-citizens who wish to visit or work in that country (for example, Americans who wish to study in Italy).
Verto will advise you through each step of the visa application process but it is important to know that Verto does not have the ability to intervene or influence the consulate.
You will need to research the process required by your abroad location country and the consulate nearest to you.
How do I know which consulate or embassy to use?
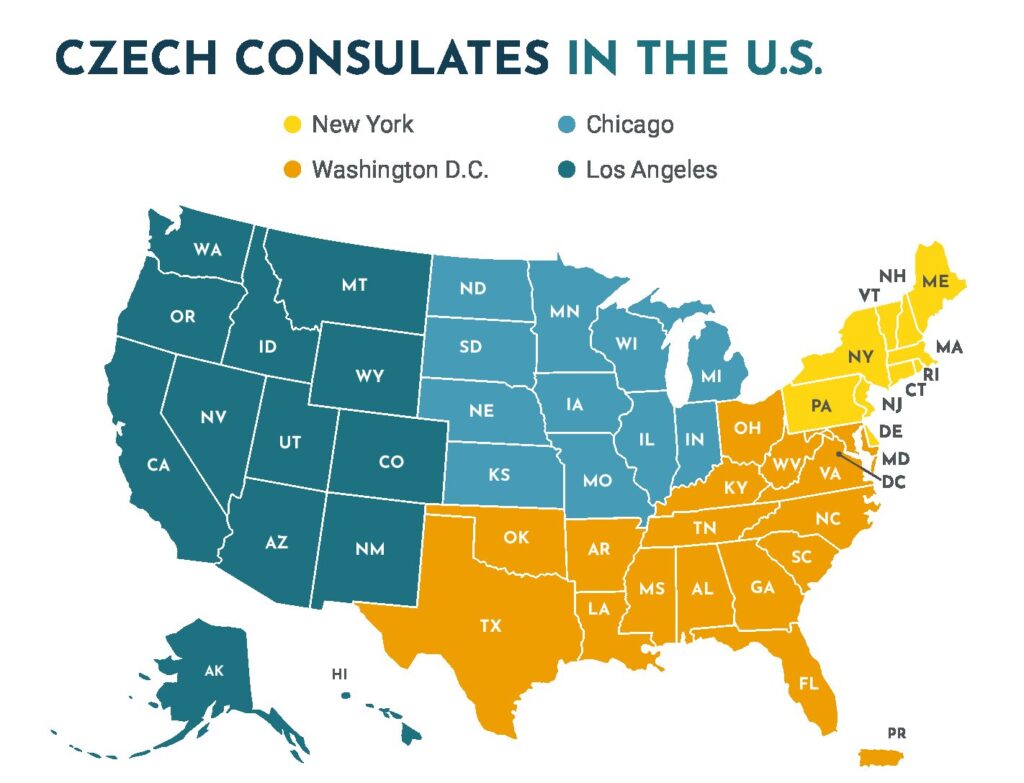
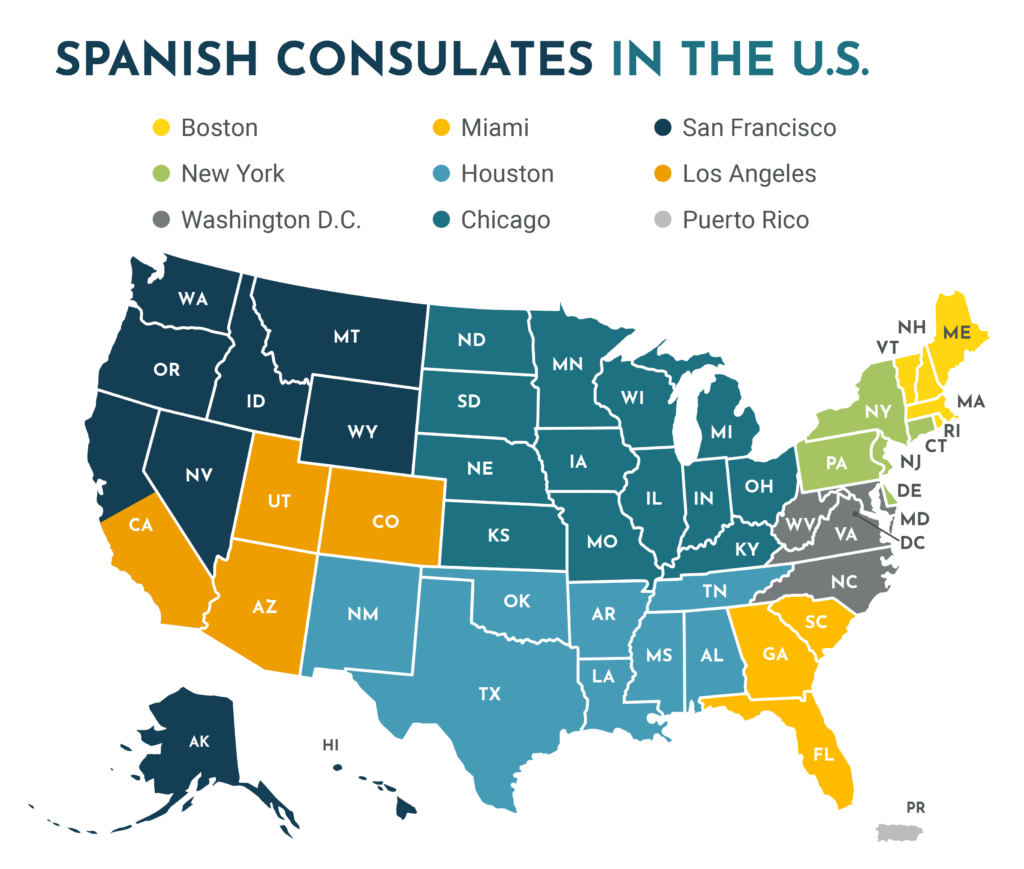
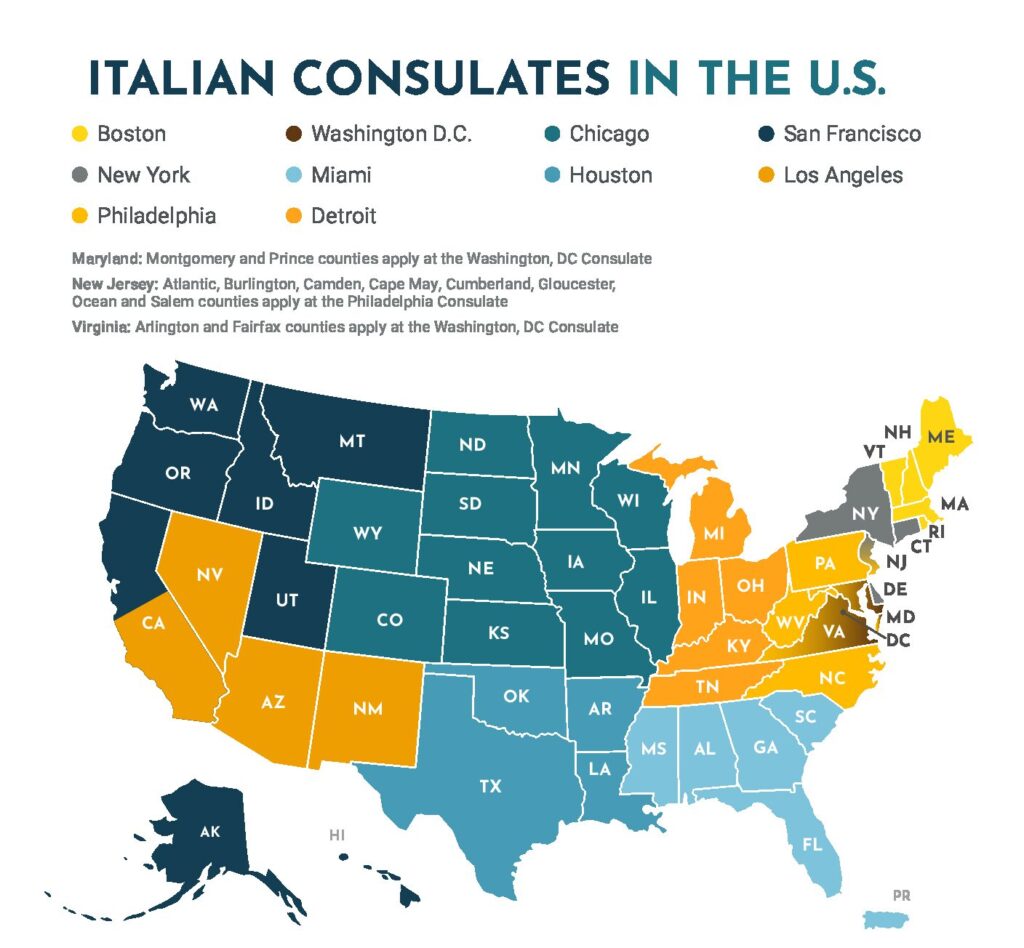
Your permanent home address determines your consular jurisdiction. For example, students who live within a certain distance of Chicago will use the Chicago consulate; but students who live in the southern United States may use a consulate specifically in Texas or Florida. You can view maps of consular jurisdictions below and on the Location Resources page to easily find which consulate is correct for you.


You can find information on how to apply for a Student Visa on Enrolled Participants Page, Location Resources for your location!
STEP 5
Schedule a visa appointment if required.
Once you identify your consulate, read about their requirements for student visa applications and find out if an in-person visa appointment is required.
Students going to Spain and Italy have the option of joining a group visa appointment, in which a group of students from the same educational program apply for student visas at the same time and the institution applies on the student’s behalf. We recommend this option. For our Fall programs, group appointments typically occur in late May or early June, and for our Spring programs, our group appointments take place in late October for Italy and mid-December for Spain. Verto will arrange this and information regarding the logistics and how to sign up will be in VertoConnect.
Students going to Prague do not have a group option.
If required, be sure to schedule your appointment as soon as possible following the instructions on the consulate’s website.
Keep in mind that you may have to travel to your assigned consulate depending on what city or state you are in. Plan any travel logistics in advance.
STEP 6
Prepare the required documents.
The specific documents required for a visa application can vary based on the country and consulate. Review the instructions on the Location Resources page for a comprehensive list.
In general, you will need to submit:
- Your physical passport
- Color copy of the passport data page
- Passport photo(s)
- Copy of your official government ID (show proof of jurisdiction)
- National visa application
- Proof of financial means showing that you have sufficient funds to support yourself for the duration of your time in that country
- Each consulate has instructions of exactly how much is required to show, but an estimate would be between $30 – $60 a day. This would be demonstrated with a bank statement showing a minimum balance of $3000 – $6000 in the student’s name.
- Proof of enrollment or study
- Proof of housing or accommodation
- Proof of medical insurance
- Visa fee payment
Some of these documents will be provided to you by Verto. The specific documents Verto provides vary by location.
Students under age 18 (Prague ONLY) will have additional requirements; this may include needing a birth certificate.
Non-U.S. citizens will have additional requirements.
STEP 7
Prepare your payment.
Visa fees range from $50-$220, depending on the country and consulate you are applying to. It’s important to budget for additional costs related to photocopying documents, notarizing documents, shipping, and postage.
As a rough estimate, you should budget around $100 to $250 in total for these expenses.
The particular method of payment varies by consulate and location. Most common is a money order that will be submitted together with all the other application documents.
As mentioned in Step 6 above, remember to plan ahead to ensure that you will have enough money in your bank account to show proof of sufficient funds for the duration of your stay.
STEP 8
Attend your appointment in person, or send your documents via mail.
If an in-person appointment is required, make sure to attend the appointment with all required documents. Use a checklist to make sure you have everything with you.
If sending by mail, gather all documents and make sure you have copies of everything for your own records. We always recommend priority shipping with a tracking number.
STEP 9
Wait for your visa to arrive.
It takes roughly 8 weeks on average to process your visa.
You will either receive your passport and any original documents by mail or via a pickup appointment. Your student visa is a sticker that will be affixed inside your passport. Check that the duration of the visa looks correct for your entire abroad experience.
TLDR Recap
What should I do now to prepare?
- Make sure you have a valid passport.
- Review this visa guide with your family.
- Find your consulate and review their instructions.
- Will you apply by mail? Will you need to visit the consulate in person? Have a plan for travel to the consulate, if necessary.
- Start gathering the documents you will need.
- Start budgeting for the visa application fees and to make sure you will have enough to show proof of financial means.
Student Visa Application FAQ
Can I apply now and get it done early?
The earliest you can apply for your visa is after you receive the required documents from Verto in the mail, you can apply up to 6 months before the program start date. This means that for Fall programs, the earliest you can start is late March; for Spring programs, the earliest is late October.
However, you can start preparing your documents now so that they are ready to submit when the application opens!
You should also start budgeting now to make sure you will have enough money in your bank account to show proof of sufficient funds for the duration of your stay.
How long does it take to get a visa? Can I expedite this process?
Processing times vary by country and consulate. The average processing time is 8 weeks.
Visa applications CANNOT be expedited and Verto does not have any power to intervene in these processes as they are handled by each country’s government.
While you cannot speed up the visa application process, you should have everything prepared in advance to ensure there are no errors or delays. Your Student Onboarding Advisor can help you understand what you’ll need to do at each stage of this process.
What if I plan to travel over the summer?
International travel over the summer makes this process really difficult because you would bring your passport with you for your trip. It is best to stay in the United States, or your home country, over the summer while your visa application is being processed since the consulate will need to keep your passport (for around 2 months on average) until they have affixed your student visa.
Students with international summer travel plans can expect additional expenses related to shipping, travel to/from the consulate, and possibly obtaining a second passport. Please communicate with your Student Onboarding Advisor about any summer travel plans as early as possible.
